
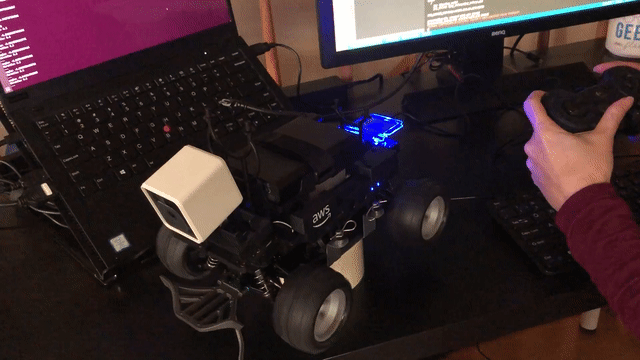
The first thing I wanted to do when I got my DeepRacer was to drive it around. It comes with a web interface where you can run it in “manual” mode, but I wanted to use a gamepad controller. (By default the web interface is only controllable via mouse.)
Since the DeepRacer comes pre-loaded with ROS Kinetic, I thought it would be a good idea to use the ROS joystick package which converts raw joystick data into a ROS message and joy_teleop to convert the joystick data into the right ROS message.
ROS Messages
The real power of ROS lies in the standardization of messages. ROS provides a standardized messaging system and interface that enables researchers at different universities to share the code their research code with each other. Using ROS you can focus on the portion of the robotics problem that you’re interested in instead of spending all your time on the non-trivial task of bringing up an entire robotic software system.
So it was an odd choice for Amazon to eschew all standard messages (except for video?) when they released the DeepRacer. Also odd is that I couldn’t find an open-source version of the messages on their GitHub page, making it much more difficult to hack into the system.
Since message headers are needed for interfacing, it’s somewhat customary in ROS to separate messages into a separate package. That way, outside contributors can both introspect and publish to your interfaces without having to have the rest of your code or dependencies. Amazon doesn’t appear to have done this. They seem to have interleaved the new messages they’ve created with the packages they created.
I’m going to assume that Amazon’s ignorance of ROS standards/best practices is to blame here. So I’ve created a package of the deepracer messages for you (so you don’t have to).
You’re welcome Amazon.
Workspace setup
I’ve also done all the work to get you up and running, so long as you have
you should be able to use my deepracer_ws as an IDE for the DeepRacer. For more information on how I set up my workspaces, check my article on docker development.
git clone --branch articles/deepracer_joy --recurse-submodules https://github.com/athackst/deepracer_ws.git
This will give you the version of my workspace and the code that I used for this article. It contains a docker container and my VSCode settings.
Note
I ran this on my laptop and connected to the DeepRacer through my home network.
Docker container
The docker container starts with a development install of ROS Kinetic. I maintain a copy of the current versions of ROS on dockerhub. These are optimized versions of ROS that contain the bare minimum needed for development with ROS. They are also tagged with a date, so you can always peg your development to a specific version.
The Dockerfile for the workspace adds a non-root user with sudo access and
sets up the working environment for the user.
To connect the docker container to the DeepRacer and use a gamepad as input, you’ll need to run it with a couple of special settings. These are set for you in the devcontainer.json file.
Privileged
You’ll need to run the container in “privileged” mode by setting the
--privileged tag in the run arguments for the container. This will allow you
to access the gamepad.
Note
Windows users: the –privileged tag is not supported in docker for Windows. You will need to develop through a VM or run directly on the DeepRacer to connect the gamepad for testing.
Network
You’ll also want to share the host network since ROS communicates over ephemeral
ports by setting --network=host tag in the run arguments for the container.
VSCode Tasks
I’ve added a couple of tasks you can use to help use the workspace. Tasks are how I supercharge my development.
-
build
The standard build task. Just runs the make command on your workspace.
catkin_make -
build (debug)
Build the code in debug mode. Useful for connecting to debuggers. (You won’t need this one for this since we just configured already existing packages)
catkin_make -DCMAKE_BUILD_TYPE=Debug -
install
The standard install task. It’s a good practice to install your workspace
catkin_make install -
launch
This will launch the deepracer_joy with your settings. Note this depends on the “source” tasks, which is convenient because re-sourcing your workspace after you make a change is an often overlooked step.
source install/setup.bash 2> /dev/null || source devel/setup.bash && roslaunch deepracer_joy deepracer_joy.launch
DeepRacer ROS messages
The first thing you need to do to interface with a ROS topic is link against the
headers or include the Python modules. I created a stand-alone package,
aws_deepracer_msgs with all of the .msg and .srv files from my DeepRacer.
Using this package, you can now include the DeepRacer messages.
There are six packages with custom messages or services:
- ctrl_pkg
- i2c_pkg
- inference_pkg
- media_pkg
- servo_pkg
- software_update_pkg
Of these, the only one the gamepad needs to interface with is the ctrl_pkg.
DeepRacer joystick control
Knowing ROS has joystick teleoperation packages, I figured it wouldn’t be too
difficult to set up my DeepRacer to use one of those. The two packages I chose
to use are the joy package and the joy_teleop package.
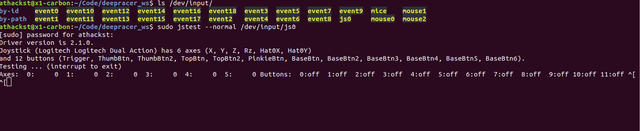
Setting up your gamepad
The first thing you’ll want to do to set up your gamepad is to verify your
connection to it. You can do this with the jstest package (which is installed
in the docker container).
-
Find the name of your joystick/gamepad
ls /dev/inputMine is
/dev/input/js0 -
Run
jstestto make sure your joystick/gamepad can appropriately connect to your docker containersudo jstest --normal /dev/input/js0You should see a line of axis and button numbers that change when you press the buttons on your gamepad.
-
Edit the launch file to update the joystick device name (optionally, you can specify it in the command line in tasks.json)
<launch> <arg name="joystick_device" default="/dev/input/js0" /> -
Edit the configuration file for your gamepad/joystick
If you’re using a different gamepad/joystick, you may need to create a new configuration file.
Using
jstest, you can see the axis and button numbers of your device. In the config file, you can edit the axis and button indexes to match your desired controlteleop: drive: type: topic message_type: ctrl_pkg/ServoCtrlMsg topic_name: /manual_drive deadman_buttons: [4] axis_mappings: - axis: 1 target: throttle scale: 0.5 - axis: 0 target: angle scale: 0.5 deadman: type: service service_name: /enable_state service_request: isActive: true buttons: [4]Note
To control the vehicle, you have to both call the
/enable_stateservice to setisActiveto true and provide a command input on themanual_drivetopic.Unfortunately, the joy_teleop package only has hooks for “buttons” that act like a “button_press” event and doesn’t have a way to react to “button_release” events. It would be better if all deadman functionality used the
/enable_stateservice (as I’m sure was intended) instead of listing it both as a service call and in deadman_buttons.I’ve always found ROS packages like this. They get you 90% toward your goal but require some additional tweaking to get all the functionality you want.
Another thing to note is that the DeepRacer command is ‘throttle’ and ‘angle’ which means that mapping both to a single control stick on a gamepad won’t work the way you think it will. As you move the joystick toward a pure turning motion, the forward velocity goes to zero. This means that your DeepRacer won’t be able to turn much unless you either publish out the kinematic conversion or map the fields to different control sticks. For now, I’ve just mapped the axis.
-
Build and source the code
catkin_make install source install/setup.bash -
Set your ros master URI to your DeepRacer IP address and launch the driver
export ROS_MASTER_URI=http://$DEEPRACER_IP:11311
export ROS_IP=<your ip address>
roslaunch deepracer_joy deepracer_joy.launch
You should now be able to hold down your deadman button and move the gamepad controller around to control your DeepRacer.
Note
If you want to run this onboard, check out the next post on [running the > > >
deepracer_joy package > > > > onboard](/articles/aws-deepracer-4-joy-onboard.html)
This is only tested as working with Ubuntu 18.04 as the host. In theory, this should work with other flavors of Linux-based systems as well. This has not been tested on MacOsx or Windows systems and they may require additional settings.
Related posts
Running the DeepRacer with ROS2
At one point I thought that I would do all new development in the next generation of OSRF software (ROS2 and Ignition). Porting the DeepRacer to use ROS2 may be an exercise in futility, but I thought it might be fun to find out just how painful it is to run a mixed ROS/ROS2 environment.
Digging into ROS on the DeepRacer
So you have a DeepRacer, and you want to learn more about the software that’s on it, read on!
Running the gamepad onboard the DeepRacer
After I hooked up a gamepad through ROS to the DeepRacer, the next step was to get it loaded directly onto the DeepRacer. Because what good is a remote control for an RC car if you need to set up a laptop to use it?